SLS 3D Printing Design Tips
March 14, 2019
To download a PDF of the design tips below please click here.
In the engineering world and manufacturing world in general, one can’t go two minutes online without coming across an article on 3D printing. It has simply exploded in the past ten years and with that explosion it has taken much of the manufacturing investment dollars with it. Like any new technology it takes time for the promise of that technology to become reality.
Rapid prototyping with quick design verification was the birth of 3D printing and the next evolution of 3D printing is end use parts. At HLH, we have seen a dramatic uptick in 3D printed parts being used as final parts for a variety of industries. SLS 3D printing, is a big player in this evolution as it offers complex design freedom and highly robust parts.
To help you design better for parts made via SLS 3D printing we have put together some design tips. Check them out below.
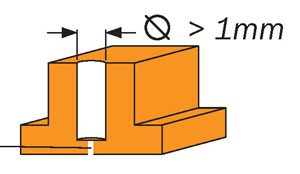
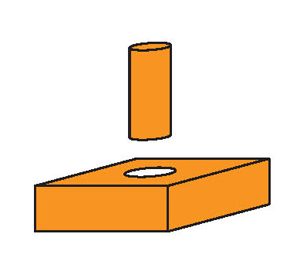
Holes – the deeper the hole the larger the diameter needed. All holes should be ≥ 1mm. Blind holes should be designed with an escape hole to remove powder.
Mating (axels, gears) – > 0.5mm and < 1mm gaps prevent fusion. Min Clearance > 0.5mm | Max Clearance < 1.0mm
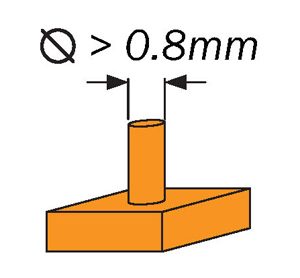
Pins – standard tolerance is +/- 0.3mm so any features with dimensions below this are unlikely to be printed without issue. So pins should be designed ≥ 0.8mm.
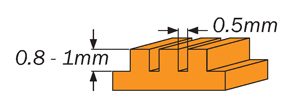
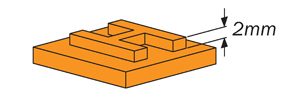
Slots – effected by depth or thickness of the wall, ≥ 0.5mm is minimum but will fail to print if the depth or wall thickness is over 2mm.
Text – sans serif such as Arial with a minimum font height of 2mm. Embossed text: > 1mm high. Engraved features: > 1mm deep.
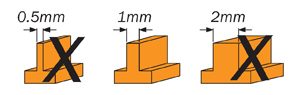
Walls – thicker walls are at risk of warpage. Thin walls can also be a problem area. 0.7mm minimum, but 1mm is preferred.